Enthusiasts of British Motor Vehicles Built Before 1985
  • Home
  • News & Events
    • Group News
    • Group Events
  • Blogs & Vlogs
  • YouTube
  • Photo Galleries
    • 2022 >
      • 2022 Classic Motor Show Gallery
      • 2022 Fat Lamb Tour Gallery
      • 2022 NC500 - the Grand Tour of the Scottish Coast Photo Gallery
      • 2022 Glos Vintage & Country Extravaganza Gallery
      • 2022 Best of Yorkshire Tour Gallery
      • 2022 Peak District Revisited Tour Gallery
      • 2022 Gaydon Weekend Gallery
      • 2022 NEC Resto Show Gallery
      • 2022 Forest of Dean Winter Tour Gallery
    • 2021 >
      • 2021 Classic Motor Show Gallery
      • 2021 Fat Lamb Tour Gallery
      • 2021 Welsh Tour Gallery
      • 2021 Jurassic Coast Tour Gallery
      • 2021 Crich Museum & Tour Gallery
      • 2021 Staffs Oatcake Tour Gallery
      • 2021 Boston CCC Show Photo Gallery
    • 2019 >
      • Yorkshire Moors Driving Tour 2019
      • Lancaster Insurance Classic Motor Show NEC Nov 2019
      • New Forest Driving Tour 2019
      • Gloucester Vintage & Steam Extravaganza Photo Gallery 2019
      • Tour of the Dark Peak Photo Gallery 2019
      • Codgers do the Cotswolds 2019
      • Bubble Car Museum Gallery 2019
      • Brecon Beacons driving tour 2019
      • Morgan Factory tour 2019
      • Practical Classics Classic Car & Restoration Show 2019
    • 2018 >
      • Lancaster Insurance Classic Motor Show NEC November 2018
      • Isle of Wight Tour 2018
      • Brunel's Somerset Tour Gallery 2018
      • Gloucester Vintage Extravaganza 2018
      • Maesteg Charity Classic Car Show & Driving Tour 2018
      • Bubble Car Museum & Driving Tour 2018
      • Peak District Driving Tour 2018
      • Practical Classics Classic Car & Restoration Show 2018
      • Coventry Transport Museum 2018 >
        • Joel Lodder's 2018 Coventry meet gallery
    • 2017 >
      • Lancaster Insurance Classic Motor Show NEC November 2017
      • Snowdonia Driving Tour 2017
      • Gloucester Vintage Extravaganza 2017
      • Lupin Farm Charity Car Show 2017
      • The Shackleton Trust 2017
      • Crich Tramway Museum 2017
      • Bubble Car Museum 2017
      • Pride of Longbridge 2017
      • April 2017 Practical Classics Restoration Show (NEC)
    • 2016 >
      • Crich Tramway Museum 2016
    • 2015 >
      • Bubble Car Museum 2015
      • Coventry Transport Museum 2015
  • Shop
  • Insurance
  • More ...
    • Contact
    • About
    • Join our Club
    • Mailing List
    • Sponsors >
      • Alvaston Press Ltd
      • Lancaster Insurance Services Ltd
      • Richard Edmonds Auctions Ltd

blogs & VLOGS

Categories

All
Alan Warwick
Andy Perman
Anthony Osborne
Austin Mini
Brett Richardson
Brian Allison
Brits Abroad
Callum Tooey
Daniel Bysouth
Drive It Day
Eddy Glass
Eric Dalton
Focus On British Classics
Gar Cole
Graeme Moore
Graham Hemsley
Group Events
Group Tours
Gus Brooks
Holly Bush
In The Workshop
Jim Lodder
Joel Lodder
John Lonergan
John Simpson
Kevin Thompson
Mark Smith
Matthew Homburg
Members Classics
Members Recollections
Mick Masters
Mike Peake
Nicholas Webb
Nick Arthur
Paul Sweeney
Projects
Steve Favill
The Weekly Groan
Tony "Tosh" Brooks
Unsung Heroes
VLOG
YouTube

Archives

December 2022
November 2022
October 2022
September 2022
August 2022
July 2022
June 2022
May 2022
April 2022
March 2022
February 2022
January 2022
December 2021
November 2021
October 2021
August 2021
July 2021
June 2021
May 2021
April 2021
February 2021
December 2020
October 2020
September 2020
August 2020
July 2020
June 2020
May 2020
April 2020
November 2019
October 2019
September 2019
August 2019
July 2019
June 2019
May 2019
April 2019
March 2019
February 2019
December 2018
November 2018
October 2018
September 2018
August 2018
July 2018
June 2018
May 2018
April 2018
March 2018
February 2018
January 2018
December 2017
November 2017
October 2017
September 2017
August 2017
July 2017
June 2017
May 2017
April 2017
March 2017
February 2017
January 2017
December 2016
November 2016
September 2016
August 2016
June 2016
May 2016
April 2016
March 2016
February 2016
January 2016
December 2015
Mildred in a lockup - in a Lockdown

1/6/2020

0 Comments

 
by Mark Smith
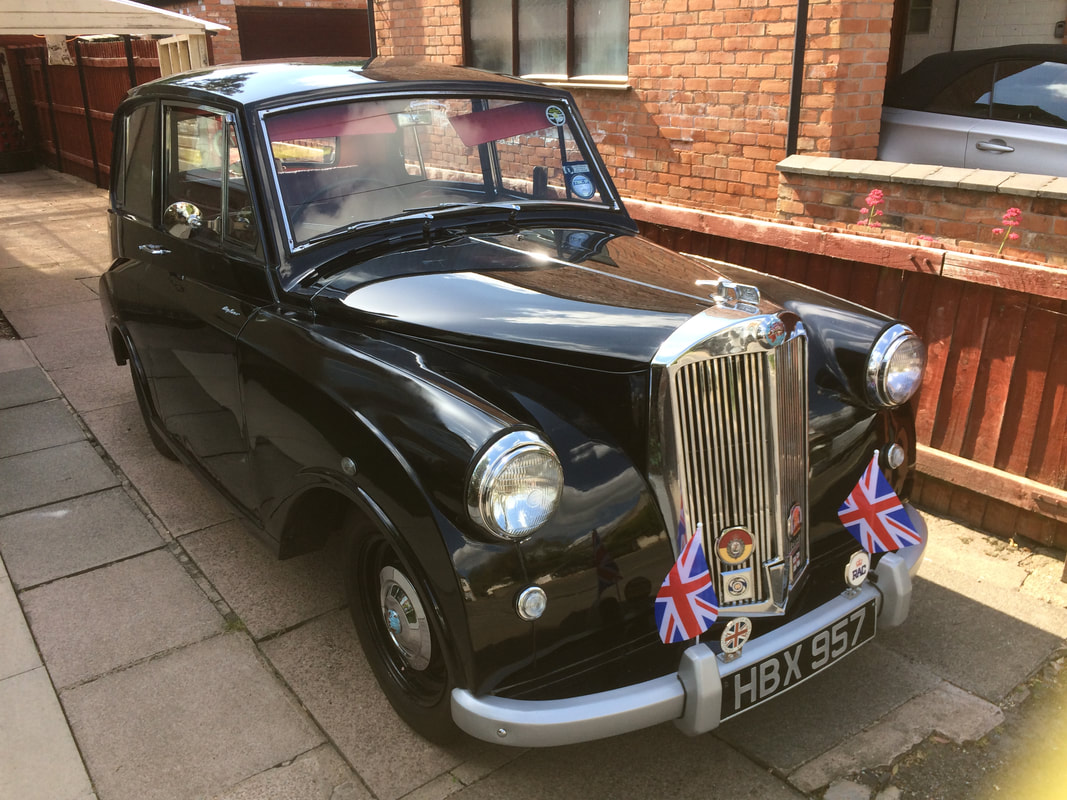
Great Aunt Mildred gets some Lockdown Pampering....Eventually!
Not sure when you will get to read this but at the time of writing it’s the last few days of May 2020, some three months into the Coronavirus Lockdown. I hope you and your families have come through this unprecedented world pandemic safe and well.
Picture
I made a mistake when the Lockdown was announced. I should have gone round to Mildred’s lock-up and liberated her but I didn’t. I left it too late to move her and so there she had to remain. Oh, some would say I should have just gone and got her anyway. After all, the lock-up is only in the next road, which is about half a mile away. From our upstairs box-room at the front of the house I can look over the gardens of the houses opposite and across the track of the Great Central Railway and see the roof of Mildred’s garage, she is that close!
I could have taken a chance and gone and got her but perhaps unlike some more modern classic cars, Mildred is a bit more conspicuous. Her design being more akin to pre-war cars than those of the early 1950’s when she was built could make a Mayflower a bit more noticeable and the last thing I wanted to do was to draw attention to myself and have someone complain that I should not be driving the car when we’ve all been told to stay at home. It would be just my luck to find there’s a Policeman stood on the corner as I drove Mildred round to home! Maybe many would say I was being a bit paranoid but as I see it, rules are rules so before doing anything I contacted Leicestershire Police and explained my plight and what I wanted to do and asked if it would be OK for me to go and collect the car, drive it straight to my house where it would be kept off the road and behind locked gates so I could carry out a few little maintenance jobs while we were all confined to home. The reply was courteous but adamant, it would be ‘an unnecessary journey’ and was therefore forbidden under the Lockdown rules in place at that time.
Time drifted by and eventually the government eased the Lockdown rules enough that I thought gave me wiggle room to legitimately move Mildred round to home so, after spending a Friday afternoon jet washing all the winter cobwebs from under the carport (which led to jet washing the whole of the drive way as it does) I eventually brought Mildred home on Saturday 16th May and work could begin. I had three particular jobs I wanted to do; one necessary and two that were mainly cosmetic.
The first of the cosmetic jobs was to sort out the rear number plate. As I am writing this piece for publication within a number of different club magazines as well as internet platforms, I had better explain to the uninitiated that the boot lid of the Mayflower was designed so that it could be lowered and used as an extra luggage platform, perhaps to strap a wicker picnic basket to. This was very much a pre-war idea and as the number plate has to be legally visible at all times, the Mayflower’s number plate was hinged so that it would hang vertically with the boot lid open. This was a problem on Mildred. An owner in the distant past had fitted an extra high visibility brake light above the number plate, obviously as a result of finding that even the traffic in the 1970’s was moving at a faster pace than Mildred was designed to do. Plus, the original small round brake lights fitted to the lower outer edges of the Mayflower’s rear wings just could not be seen clearly enough.
The additional brake light was a brilliant idea back then but as even the smallest of modern cars is now able to out-accelerate the boy racers of forty years ago, I am more than grateful for it! However, it was fitted to the boot lid immediately above the number plate mounting bracket so when the lid was lowered, the number plate light which moves with the plate, jammed on the auxiliary brake light, preventing the number plate from hanging vertically. OK, this was probably never going to be a problem to me. The chances of driving the car with the boot lid open is probably not going to be very high but I suppose I must be a little bit OCD as I like things to work as the designer intended. 
The auxiliary brake light only needed to be raised up the boot lid by around a quarter of an inch but these jobs are never as simple as they first appear, are they? Of course not! Yes, I could have just moved the light, but the number plate mount was rusty. Can’t have that! As my parents would have said, ‘If a job is worth doing, it’s worth doing properly’ so off came the number plate assembly! The number plate was removed from its back plate first and then, after the wires were removed, the light was also unbolted and then the whole assembly was unbolted from the boot lid. The various parts were cleaned with wire brushes etc before rust killer was applied and then given a coat of black spray paint.
While the number plate assembly was drying, the auxiliary brake light was removed. As I said earlier, it only needed to be raised by a quarter of an inch but I had been concerned that the original fixing holes would be left visible which would be unsightly and had wondered how I was going to fill them. As luck would have it the problem was sorted for me as the mounting plate of the light was so deep that it covered the old holes once mounted in its new position. The plate fits nice and tight so should not have allow water ingress that would cause the holes to rust but as an extra precaution, I cut a gasket out of a small sheet of 1.5mm thick rubber gasket material I had ordered off eBay to complete another of the little jobs I had lined up - details on that to follow. Once dry, the number plate mount along with the number plate and light were refitted and now the assembly hangs vertical when the boot lid is open, just as it should do. Of course the auxiliary brake light can’t now be seen if the car is driven with the boot lid open but that is a whole new kettle of fish and anyway, the car is unlikely to be driven with the lid open.
Job number two was not cosmetic it was absolutely crucial! On a family Lockdown walk, we ‘happened’ to walk past Mildred’s garage and so stopped by to say hello and check she was OK which of course involved starting the car’s engine. Mildred was driven out of the lock-up just far enough to be able to raise her bonnet and do a visible check and that’s when the problem came to light; the gasket between the float chamber lid and carburetor was leaking! This was not good as the exhaust manifold is directly below the inlet manifold. This could have caused a nasty fire if not sorted so the float chamber lid was removed and the fragile gasket carefully lifted away. Luckily, I had the remains of a sheet of gasket material left over from a job I did on my 1978 Lada some years ago and that was plenty big enough to cut out a new float chamber seal. After placing the remains of the gasket on top of the gasket sheet and drawing around it, I cut it out with a crafting scalpel and fitted it in place, another job done.
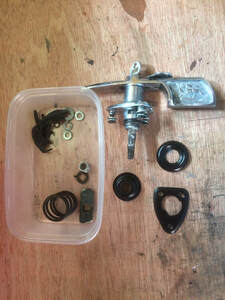
Job number three was another of those ‘unnecessary but it should work’ types. The bonnet catch was made to be lockable but none of Mildred’s keys worked it. Now this could have been a problem with the lock barrel or it may be that the key had been lost in the distant past. Either way, the only way to find out was to remove the bonnet catch assembly from the car and strip it down. The catch assembly was easily removed from the car but then things got more difficult! In order to remove the lock barrel from the catch assembly, the bonnet mounting shroud had to be first separated from the handle shaft but that was easier said than done! The locking action of the bonnet catch requires a crude metal bar to be slid through a hole in the shaft where it lines up with a square hole in the shroud casting that then stops the shaft turning when locked.
My problem was that to remove the shroud, the locking bar needed to be slid through the shaft on the ‘open’ side and into a special groove that runs the height of the shroud, allowing the shaft to be pulled though the shroud once the retaining clip is removed. Unfortunately, the locking bar was positioned so that it was neither far enough across to lock the catch assembly or far enough over in the ‘open’ position that it was located in the groove and in order to move the bar over, a key was required which of course I had not got! This caused a lot of head scratching. After looking at the catch assembly from various angles, through gritted teeth and making another mug of coffee and mentally willing the bar to move, I hit upon the idea of trying to ‘pick’ the lock with a couple of jeweler’s screwdrivers. The theory being that if I carefully mounted the bonnet catch assembly in a vice I could slide one screwdriver down inside the lock to push the spring-loaded brass tangs into the side of the lock barrel, therefore disengaging the lock and after simultaneously sliding another jeweler’s screwdriver in down the side of the first one, it might be possible to get enough force to turn the lock and slide the locking bar into the correct position. It took a few goes but it eventually worked and I was able to slide the shroud off the shaft…..phew!
Picture
With the parts separated it was just a case of driving out the pin that held the lock barrel into the shaft with the aid of a small nail and tack hammer and the barrel was out. Now I would be able to see what the problem was and it didn’t take long! All these old lock barrels are stamped with the key number and it was clearly visible on this one and it did not match either of the other two key numbers, one for Mildred’s door and boot lid locks and the other for the ignition switch. On closer inspection I noticed that the only difference between the door lock and the bonnet lock barrel was the very first brass tang. The door key was missing a space for the tang to drop into. As I had a few door keys I cut an additional niche into the top of the key with the Dremel and hey presto, it worked! The lock barrel could now be turned. The bonnet catch assembly was rebuilt and after and a new gasket to replace the one that sits between the shroud and the bonnet was cut from the small sheet of 1.5mm thick rubber mentioned earlier (the original was too far gone), the whole assembly was fitted back onto the bonnet of the car. Once fitted back on, the lock was tested again and worked fine. Two new keys of the correct code were ordered plus a replacement for the butchered door key and the bonnet can now be locked as the manufacturer intended. 
However, this is not quite the end of the saga as there is quite a bit of play in the catch handle when in the locked position. I believe this is caused by wear in the small bar that slides through the handle shaft when the key is turned, locking the shaft and stopping the bonnet from opening. The metal plate mounted on the end of the shaft that actually forms the bonnet catch is also quite worn. Both of these parts could do with replacing with better condition ones. It is possible there are some serviceable replacements in the Triumph Mayflower Club’s spares cache but due to the current Lockdown situation searching the stores stock will have to wait for another day!
In addition to the work carried out on the vehicle itself, I have also been filling spare moments with building a ‘period’ tissue box cover for the rear parcel shelf. The intention was to make something that could pass as being an after-market accessory, sold to the discerning Mayflower owner of the 1950’s! The cover is made from 6mm MDF, obviously a material not available in the 50’s. The top and sides are all held together with glued dovetail joints and the removable bottom is held in place by magnetic catches. The whole structure has been covered in a deep red sticky-backed felt dolls house carpet material that blends quite nicely with Mildred’s interior. For anyone that likes doing craftwork and model making, I can thoroughly recommend these sheets of dolls house carpet. They are not expensive and are easy to work with. To finish off the tissue box and connect it with the Mayflower, the Mayflower script was traced from the front of the Owners Handbook, transferred onto the reverse side of some black felt carpet material and then cut out with the modeling scalpel. Two were made and one carefully stuck onto either side of the tissue box cover. In my simple mind the result is just how I would imagine such an accessory to have looked had one been available in those early days of post war marketing. 
So that is the updated situation on Mildred. A number of small jobs completed, most of which are cosmetic rather than necessary but all help to take Mildred back nearer to the condition she would have been in at the time she left the Standard Triumph factory, in function at least! All that is needed now is a return to a more normal way of life that allows the classic vehicle shows and meetings that we all enjoy to resume.
0 Comments

Your comment will be posted after it is approved.


Leave a Reply.

    RSS Feed

Privacy Policy 

​Your shopping bag

Home

News

Shop

Insurance

Contact

Picture
Picture
Picture
© 2022 Enthusiasts of British Motor Vehicles Built Before 1985
  • Home
  • News & Events
    • Group News
    • Group Events
  • Blogs & Vlogs
  • YouTube
  • Photo Galleries
    • 2022 >
      • 2022 Classic Motor Show Gallery
      • 2022 Fat Lamb Tour Gallery
      • 2022 NC500 - the Grand Tour of the Scottish Coast Photo Gallery
      • 2022 Glos Vintage & Country Extravaganza Gallery
      • 2022 Best of Yorkshire Tour Gallery
      • 2022 Peak District Revisited Tour Gallery
      • 2022 Gaydon Weekend Gallery
      • 2022 NEC Resto Show Gallery
      • 2022 Forest of Dean Winter Tour Gallery
    • 2021 >
      • 2021 Classic Motor Show Gallery
      • 2021 Fat Lamb Tour Gallery
      • 2021 Welsh Tour Gallery
      • 2021 Jurassic Coast Tour Gallery
      • 2021 Crich Museum & Tour Gallery
      • 2021 Staffs Oatcake Tour Gallery
      • 2021 Boston CCC Show Photo Gallery
    • 2019 >
      • Yorkshire Moors Driving Tour 2019
      • Lancaster Insurance Classic Motor Show NEC Nov 2019
      • New Forest Driving Tour 2019
      • Gloucester Vintage & Steam Extravaganza Photo Gallery 2019
      • Tour of the Dark Peak Photo Gallery 2019
      • Codgers do the Cotswolds 2019
      • Bubble Car Museum Gallery 2019
      • Brecon Beacons driving tour 2019
      • Morgan Factory tour 2019
      • Practical Classics Classic Car & Restoration Show 2019
    • 2018 >
      • Lancaster Insurance Classic Motor Show NEC November 2018
      • Isle of Wight Tour 2018
      • Brunel's Somerset Tour Gallery 2018
      • Gloucester Vintage Extravaganza 2018
      • Maesteg Charity Classic Car Show & Driving Tour 2018
      • Bubble Car Museum & Driving Tour 2018
      • Peak District Driving Tour 2018
      • Practical Classics Classic Car & Restoration Show 2018
      • Coventry Transport Museum 2018 >
        • Joel Lodder's 2018 Coventry meet gallery
    • 2017 >
      • Lancaster Insurance Classic Motor Show NEC November 2017
      • Snowdonia Driving Tour 2017
      • Gloucester Vintage Extravaganza 2017
      • Lupin Farm Charity Car Show 2017
      • The Shackleton Trust 2017
      • Crich Tramway Museum 2017
      • Bubble Car Museum 2017
      • Pride of Longbridge 2017
      • April 2017 Practical Classics Restoration Show (NEC)
    • 2016 >
      • Crich Tramway Museum 2016
    • 2015 >
      • Bubble Car Museum 2015
      • Coventry Transport Museum 2015
  • Shop
  • Insurance
  • More ...
    • Contact
    • About
    • Join our Club
    • Mailing List
    • Sponsors >
      • Alvaston Press Ltd
      • Lancaster Insurance Services Ltd
      • Richard Edmonds Auctions Ltd